
.jpg)

Running an eCommerce business on Shopify can be incredibly rewarding, but it comes with its fair share of challenges—especially when it comes to managing finances.
From the tedious task of manually tracking sales and expenses to the complexities of handling different tax obligations across regions, Shopify sellers often find themselves buried in administrative work instead of focusing on growth.
The risk of human error, time-consuming reconciliations, and the struggle to maintain accurate records can quickly become overwhelming, leaving you questioning if there's a better way to manage your finances.
This guide is here to show you how automated Shopify accounting solutions such as Link My Books can help you alleviate these pain points, as well as set your business up for long-term success.
Key Takeaways from this Post
Manual accounting can lead to errors and inefficiencies, especially as your business grows. Automating your accounting processes helps you save time, reduce mistakes, and gain clearer financial insights.
Managing sales taxes, VAT, and GST for international sales can be complex. Using specialised accounting tools ensures accurate tax calculations and helps you stay compliant with varying regulations in different markets.
Link My Books seamlessly integrates with platforms like Shopify, Xero, and QuickBooks to automate data entry, simplify reconciliation, and provide real-time financial reports—eliminating common accounting challenges and freeing up your time to focus on business growth.


What is Shopify Accounting?
Shopify accounting is the process of managing and recording financial transactions of a store operating on the Shopify platform. This includes tracking sales, expenses, taxes, payment processing fees, and refunds.
By integrating with accounting software like QuickBooks or Xero, Shopify accounting automates the synchronisation of financial data, simplifies bank reconciliations, and aids in tax preparation. It also involves managing inventory costs, calculating profit margins, and analysing sales performance.
Proper Shopify accounting is essential for maintaining accurate financial records, ensuring compliance, and making informed business decisions.
What does Shopify accounting involve?
To illustrate how Shopify accounting works, we can break it down into a number of core areas.
Handling fees and charges
Shopify accounting is concerned with tracking fees and charges associated with payment gateways, shipping, and other services. Properly recording these costs is essential for maintaining accurate profit margins and financial statements.
Inventory management
Effective Shopify accounting also involves keeping precise records of inventory levels, costs, and valuation. This includes tracking stock movements, recording costs of goods sold (or COGS, more on that later), and ensuring that your financial data aligns with actual inventory levels.
Multi-currency transactions
For businesses that sell internationally, Shopify accounting may involve managing multi-currency transactions. This includes recording sales and expenses in different currencies, accounting for exchange rates, and ensuring compliance with local tax regulations in various countries.
Reconciling payment gateway discrepancies
Discrepancies between payment gateway reports and Shopify sales records can occur. Shopify accounting includes identifying and resolving these discrepancies to ensure that financial records are accurate and that no transactions are missed or double-counted.
Reimbursements for returns
Shopify accounting is also concerned with managing reimbursements for product returns. This includes recording the refunded amounts, adjusting your inventory, and ensuring that your financial records reflect these changes. Properly handling reimbursements is crucial for maintaining accurate revenue and inventory data.
Settlements or disbursements
Settlements or disbursements are the funds transferred from Shopify to your bank account after sales are made. Reconciling these payments with your sales data, accounting for any fees deducted by payment gateways, ensuring that all transactions are accurately recorded, and similar activities are a major element of Shopify accounting.
Managing VAT, GST, sales tax, and other taxes
Managing various taxes, such as Shopify VAT in the UK, GST in Australia, and sales tax in the US, is a critical part of Shopify accounting. This includes correctly applying tax rates to different products, ensuring compliance with local tax laws, and accurately reporting and remitting taxes to the appropriate authorities.
Managing discounts and promotions
Shopify accounting is often concerned with recording discounts and promotions offered to customers. This includes tracking the impact of these discounts on revenue and ensuring they are properly reflected in financial statements.
Can you do accounting and bookkeeping on Shopify
While Shopify provides basic financial reports, handling your bookkeeping directly within the platform can be both time-consuming and error-prone.
You have to download multiple reports, combine them manually, and ensure that all data is accurately aligned—a task that becomes increasingly difficult as your business grows. The complexity of managing numerous transactions, along with varying taxes per order and item, makes it easy to make mistakes.
Rather than spending hours on manual bookkeeping, it's more effective to use accounting software such as Link My Books. Link My Books accurately imports your Shopify data, eliminating human error and allowing you to focus on strategic business decisions that drive growth.
Shopify Accounting vs Shopify Bookkeeping
Accounting and bookkeeping are similar concepts, and most laymen use the words interchangeably. However, for professional accountants these two activities are rather distinct. To help you understand the difference between Shopify accounting and Shopify bookkeeping, we prepared a table of comparison.
How to do bookkeeping for Shopify sellers
Let’s look at how easy Shopify bookkeeping can be with the right tech stack:
- Connect Shopify to Xero/QuickBooks using Link My Books.
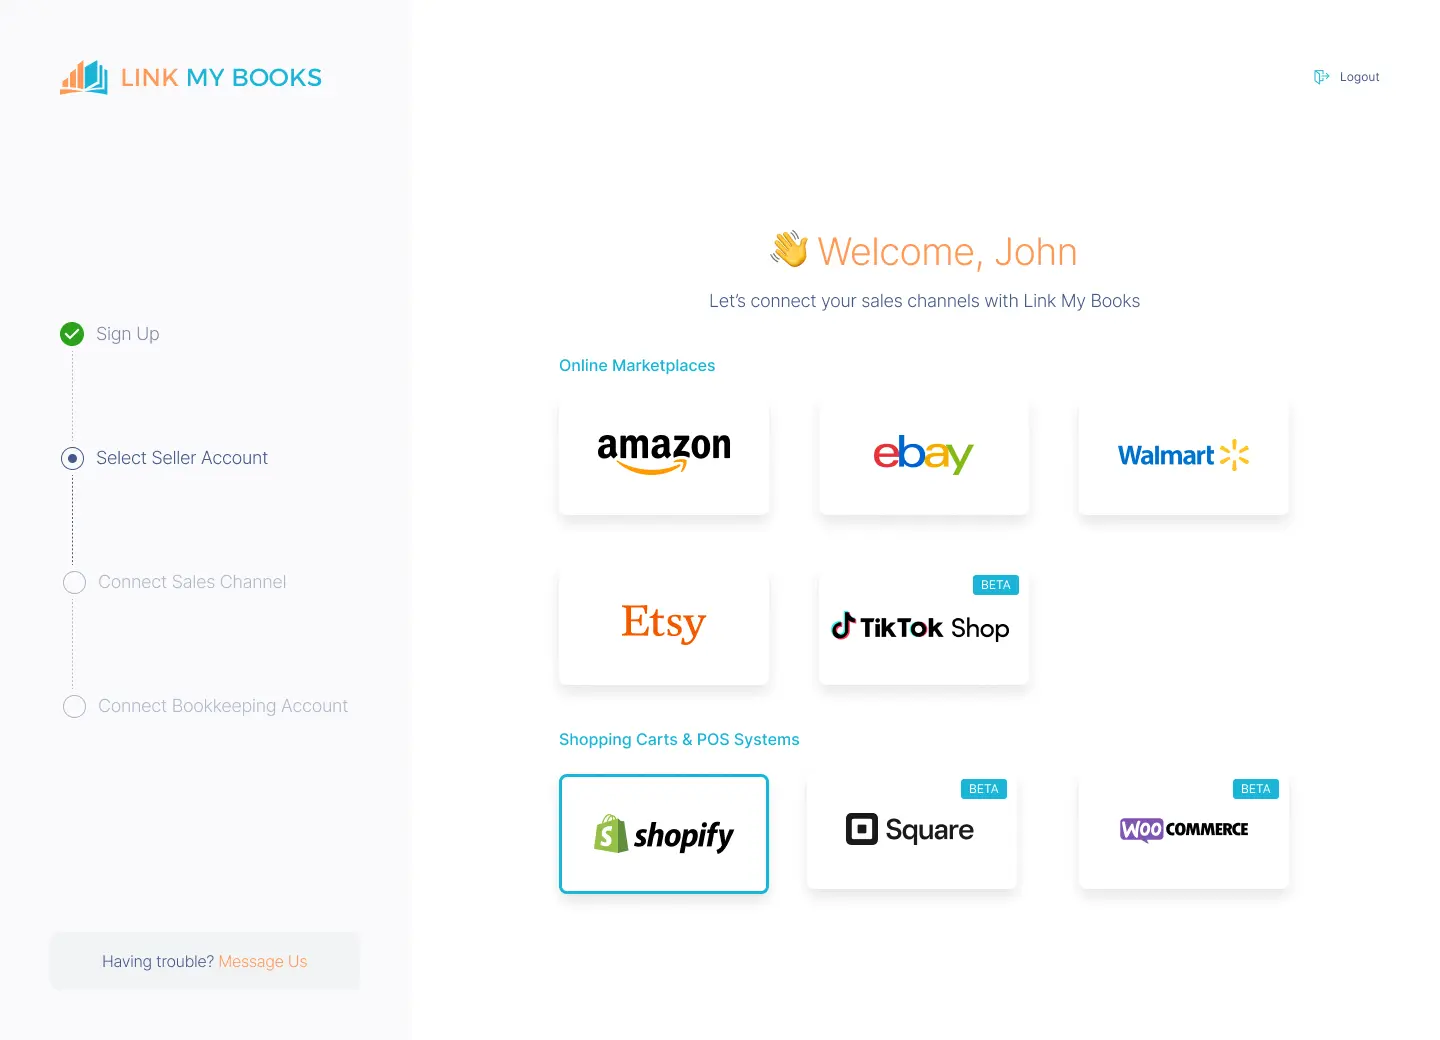
- Complete guided setup wizard to ensure accurate accounts and taxes are applied.
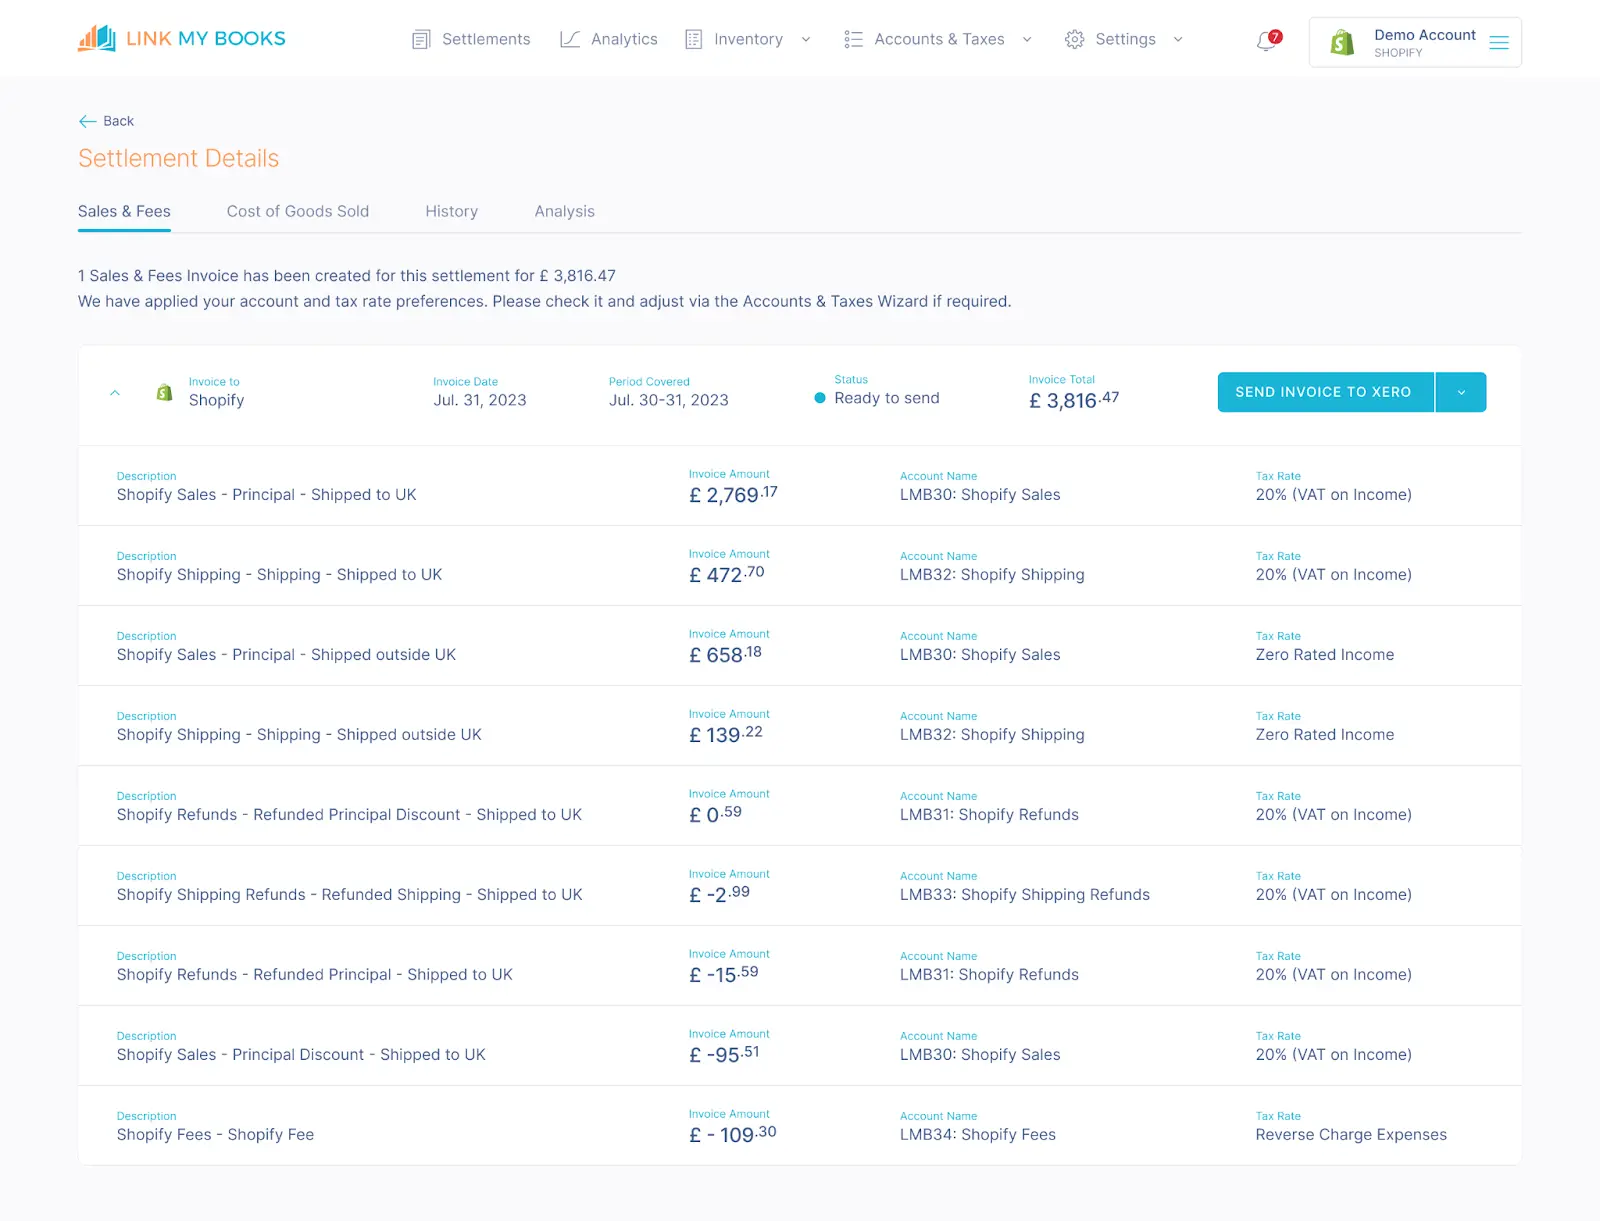
- Link My Books verifies all transactions, ensuring that every order is treated correctly for tax purposes.
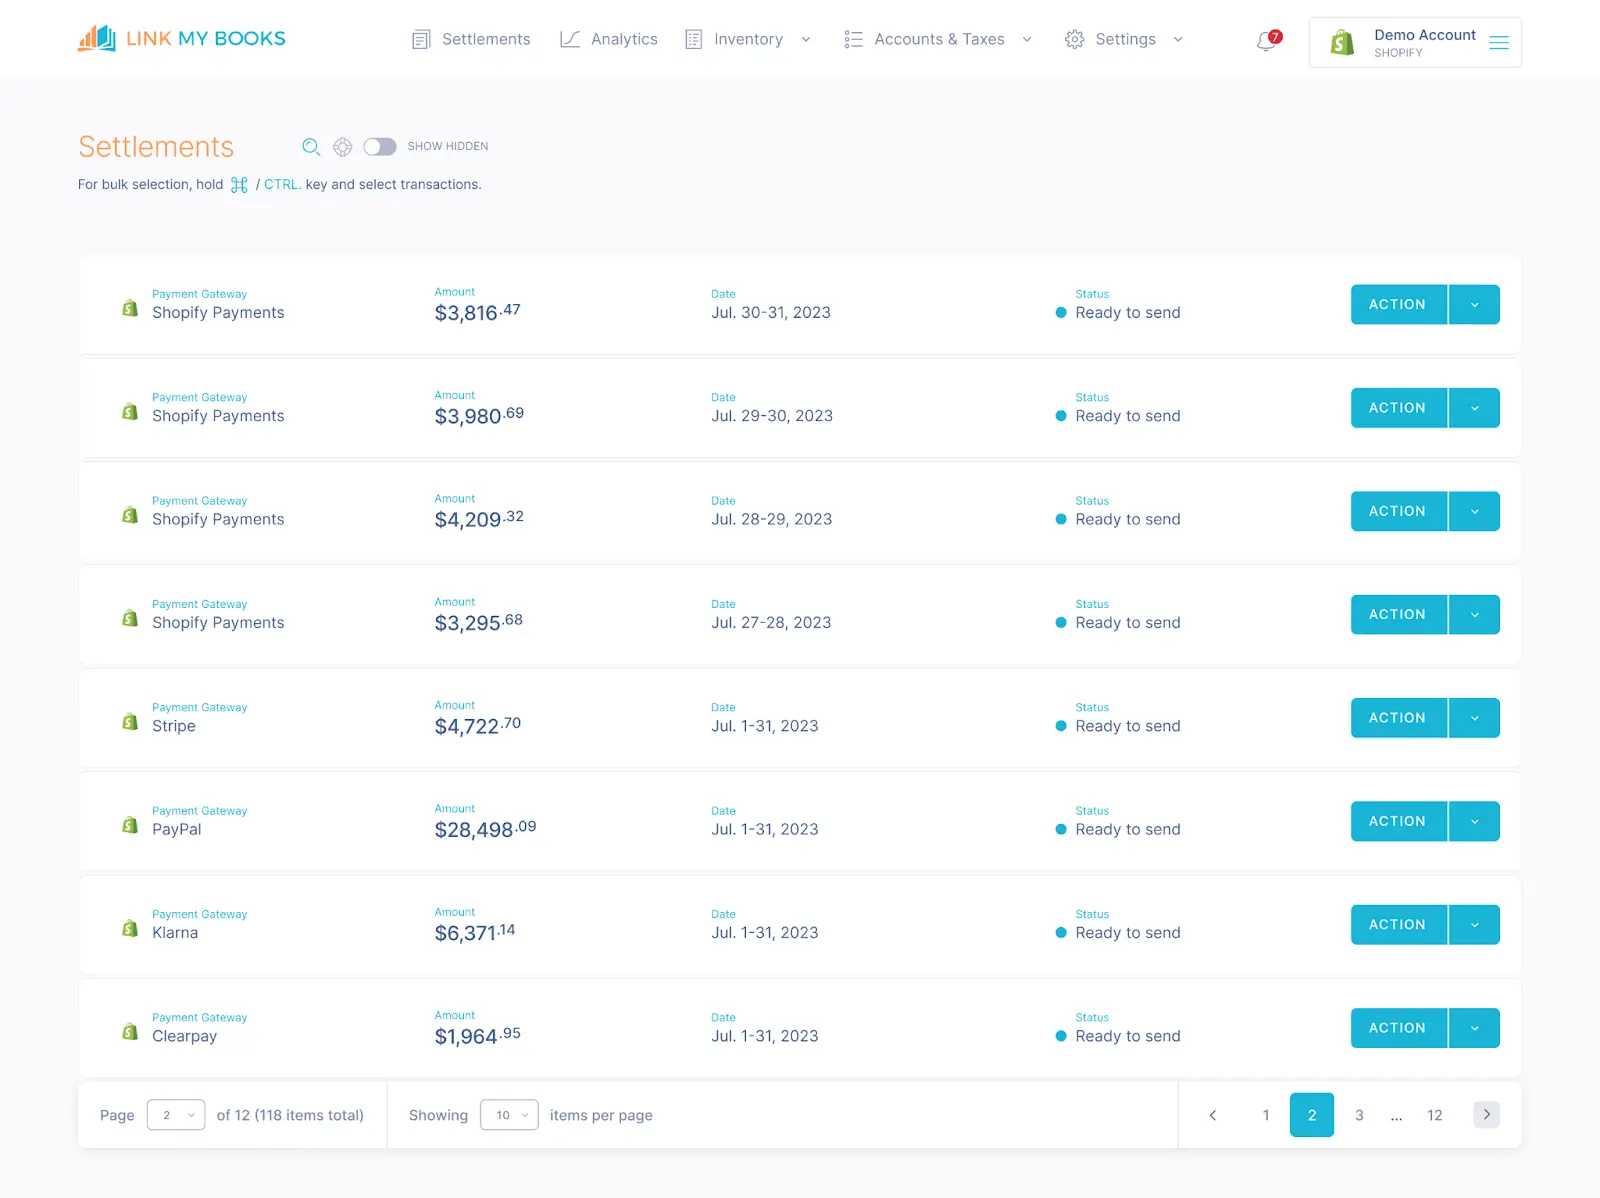
- Link My Books then creates a detailed summary invoice in Xero/QuickBooks, itemizing the payout into sales, refunds, and fees, and assigning them to the proper accounts with the correct tax rates.
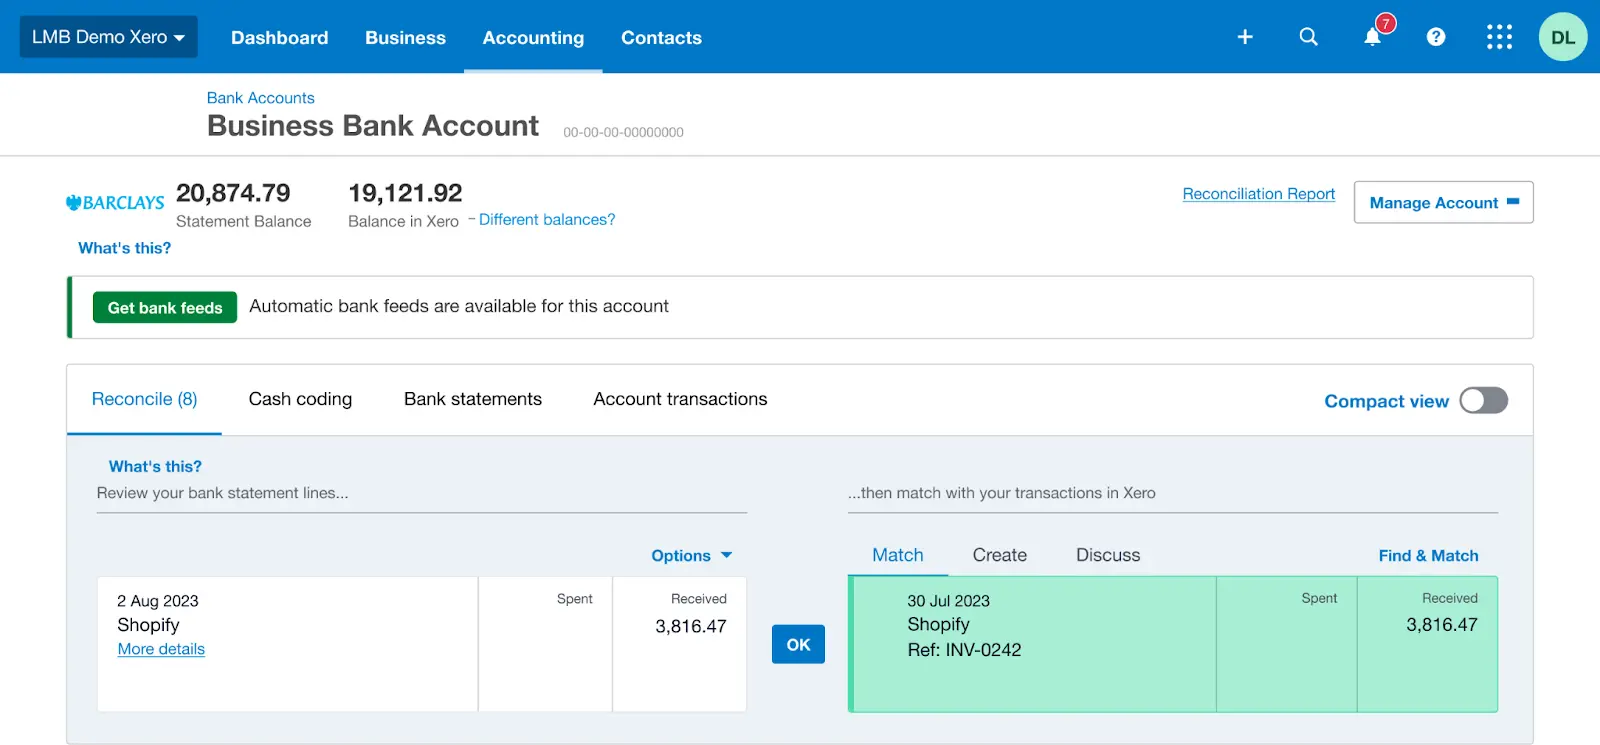
- Shopify Payments entries match effortlessly with the bank deposit in a single click.
- Other payment gateway entries are cleared via a clearing account.

Simplify your Shopify accounting today with Link My Books. Automate your finances, stay compliant, and focus on growing your business. Sign up for a free trial by registering an account.
Best Accounting Tools For Shopify Businesses
Xero with Link My Books
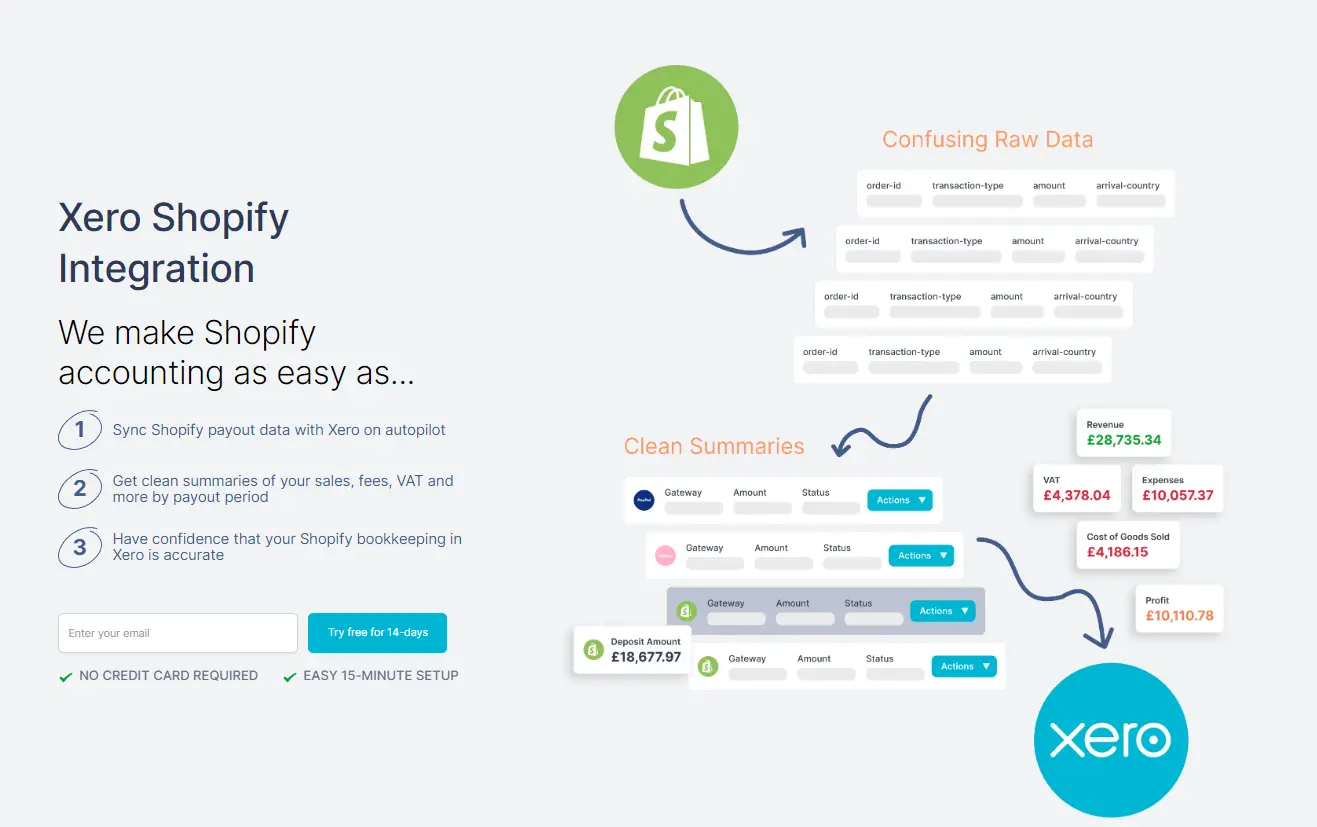
Link My Books is the best way to integrate Shopify with Xero. This integration allows you to track financial performance, manage invoices, and stay on top of taxes effortlessly. The real-time synchronisation between Shopify and Xero, facilitated by Link My Books, reduces the risk of errors and provides a clear picture of your business’s financial health.
QuickBooks with Link My Books
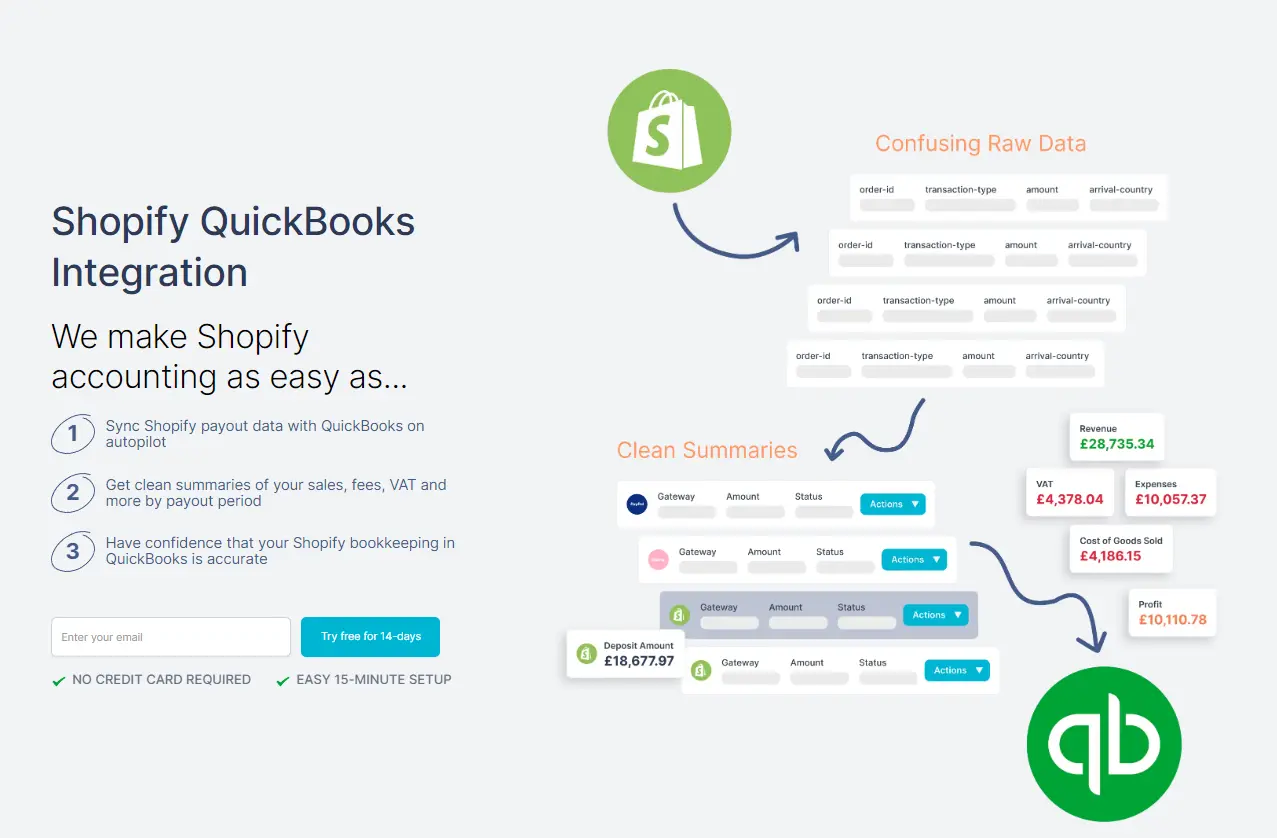
Link My Books is the best QuickBooks integration solution to help you streamline your accounting workflow with automation. By integrating these two solutions you can easily manage expenses, monitor cash flow, and ensure tax compliance. You also receive detailed financial insights needed to make informed business decisions.
The benefits of automated Shopify accounting software
Automation is essential for maintaining your competitive edge as a Shopify seller. We took this insight to heart when developing Link My Books, and we believe we've made the best Shopify automation tool currently available on the market.
Here are some of the key benefits of Shopify accounting automation.
Saving time
Shopify automation reduces spending on routine financial tasks such as transaction recording and reconciliation, allowing you to focus on other aspects of your business. You will save countless work-hours for both yourself and your employees.
Reducing human error
Shopify automation software minimises the risk of mistakes in financial records by automating data entry and calculations. This will eliminate human error as a factor from the equation, keeping your accounting clean and accurate.
Saving money
Accounting errors can be quite costly, especially when they accrue over time. With Shopify automation, you can cut costs associated with manual bookkeeping and reduce the likelihood of paying out of pocket for something that can easily be prevented with the right software tools.
Preventing tax overpaying
Paying taxes above the required amount can jeopardise your bottom line over time, and cause other accounting complications. Automated Shopify accounting software will ensure accurate tracking of expenses and deductions, preventing tax overpayment.
Providing strategic business insights
Strategic planning is nigh impossible without accurate, up-to-date financial data. Shopify automation tools can help you in this regard by delivering detailed financial reports and real-time data, helping you gain insights into your business’s performance.
Simplifying tax filing procedures
Tax filing can be a major headache for Shopify sellers, especially if you operate internationally. Automation tools such as Link My Books help you organise financial records and prepare necessary documents for tax filing, making the whole process easier and less stressful.
Enhancing security and achieving peace of mind
Using Shopify automation platforms helps you protect your financial data with robust security features, offering peace of mind regarding data safety.
Why Shopify accounting is vital for sellers
Shopify sellers can get a lot of mileage from even the most basic accounting procedures. Here is what you stand to gain.
Compliance with tax laws
Accounting keeps your financial records organised and easily accessible, making it easier to stay compliant with regulations and prepare for audits.
Understanding your business's financial health
With proper accounting you gain access to up-to-date financial data and reports, enabling you to make informed decisions based on current business performance.
Planning for the future and exiting
If you plan on selling your Shopify business somewhere down the line, accounting can help you by ensuring that your financial records are in order, helping you maximise business value for a smooth exit strategy.
Streamlining financial management
Accounting helps you centralise all essential financial activities, making it easier to manage your Shopify store’s finances from one platform.
Automating bookkeeping tasks
Automated Shopify accounting allows you to record transactions, reconcile bank accounts, and categorise expenses with a few clicks, significantly reducing manual bookkeeping work.
Improving accuracy and efficiency
Manual bookkeeping is slow and prone to errors. In contrast, automated accounting reduces human mistakes and speeds up financial processes, leading to more accurate financial records and efficient management.
Customizable reporting
If you need to provide custom reports for various stakeholders, automated Shopify bookkeeping offers the ability to generate detailed and customised financial reports, providing deeper insights into specific aspects of your business.
The Challenges with Managing Shopify Business Accounts
Shopify business account management is quite challenging at the best of times, and downright stressful if you're not prepared. Here is a list of challenges you're likely to encounter as a Shopify seller.
Time-consuming activities
Managing financial data and generating reports manually can be time-consuming, affecting overall efficiency.
Multiple reports to download and combine
Downloading and consolidating multiple reports from different sources can be complex and labour-intensive.
Large transaction volumes
Managing and processing large volumes of transactions can be challenging without automated solutions.
Complex tax liabilities due to international sales
Ensuring accurate calculation and collection of sales taxes across different regions can be difficult.
Integration difficulties
Synchronising Shopify with other systems like accounting software can be technically challenging, potentially causing data mismatches or integration problems.
Complex financial tracking
Managing and tracking multiple revenue streams and expenses can become complicated without a streamlined solution.
Manual data entry errors
Errors can occur when entering financial data manually, affecting the accuracy of records.
Data reconciliation issues
Ensuring that financial data from Shopify matches bank statements and other records can be difficult and prone to discrepancies.
eCommerce accounting Methods: Manual vs Automated
Extra tips on how to do Shopify seller accounting
Shopify seller accounting can be simplified to a large extent by implementing certain measures. Here are a couple of ways you can do this.
Choose the right accounting method
Start by selecting the appropriate accounting method—cash or accrual—depending on your business size and complexity. Cash accounting is simpler, but accrual accounting provides a clearer picture of long-term financial health.
Separate personal and business finances
Keep your personal and business finances separate, as this is crucial for accurate accounting and easy tax filing. Open a dedicated business bank account to streamline financial management and prevent mixing funds.
Use accounting software
Invest in reliable accounting software such as Link My Books to automate tedious tasks, improve accuracy, and provide real-time insights into your financial performance. This is especially important as your Shopify business grows.
Maintain organised accounts
Stay organised with your financial records, including receipts, invoices, and transaction logs. This will save time and reduce stress during tax season. Regularly update and reconcile your accounts to keep everything in order.
Perform regular checks
Conduct regular financial reviews to catch discrepancies early and ensure your accounts are accurate. Regular checks help maintain a clear understanding of your financial status and prevent potential issues.
Set aside time
Dedicate specific time each week or month to manage your accounting tasks. Consistency in handling your finances will prevent them from becoming overwhelming and keep you on top of your business’s financial health.
Ensure tax compliance
Stay informed about the tax regulations that apply to your Shopify business. Use tools or consult with a professional to ensure compliance and avoid costly penalties.
Utilise free resources
Take advantage of free resources such as online tutorials, webinars, and guides to improve your understanding of eCommerce accounting. These can provide valuable tips and updates on best practices without additional costs.
Hire an eCommerce accountant
Hiring an eCommerce accountant can provide specialised expertise in managing the unique financial challenges of an online store. They can help with tax compliance, financial planning, and optimising your bookkeeping processes, ensuring your Shopify business runs smoothly and profitably.
You can find an approved accounting partner through Link My Books
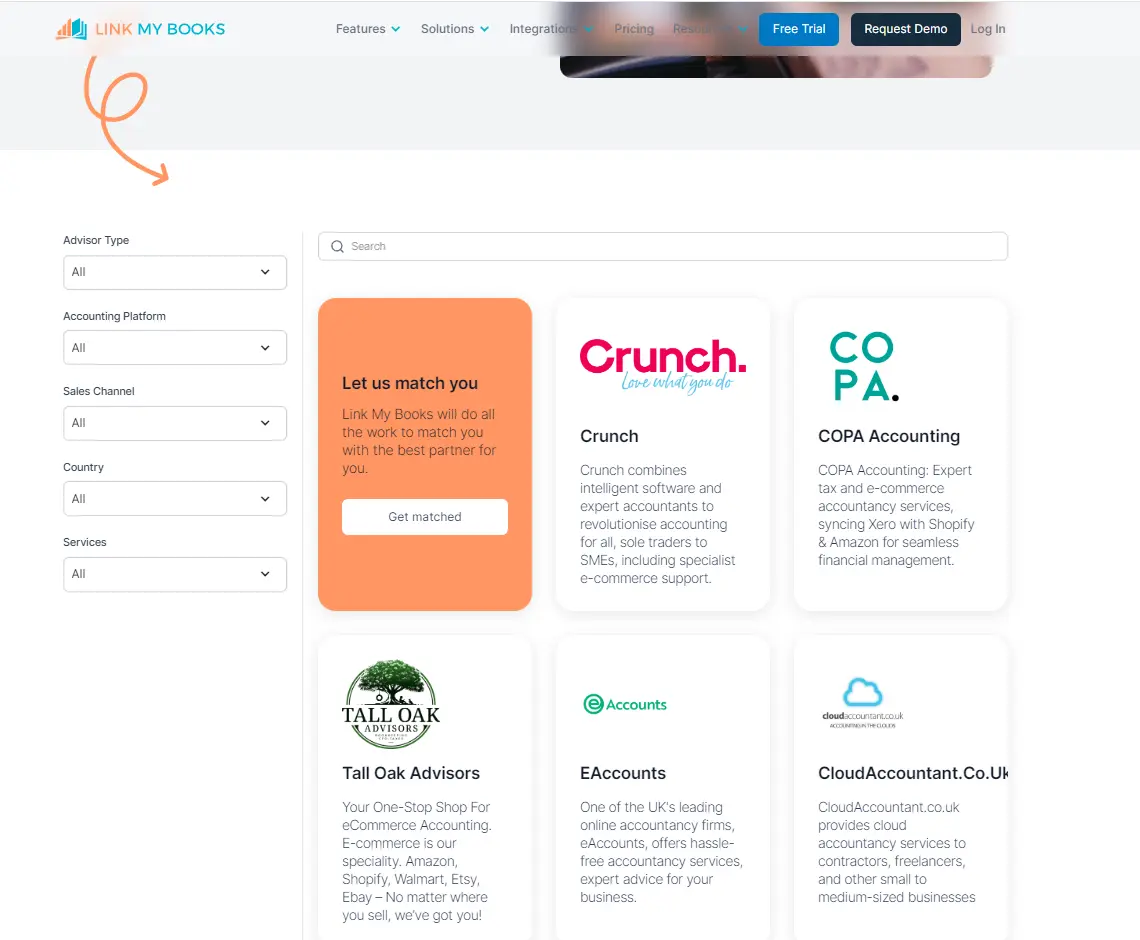
Set your criteria and find the best fit for your business.
Key financial reports to know for Shopify Sellers
To assess the financial health of your Shopify business, it is essential to understand key financial reports and statements. At the bare minimum, you should get acquainted with the following three.
Profit & Loss Statement
The Profit & Loss (P&L) statement summarises your Shopify store's revenues, costs, and expenses over a specific period. It shows whether your business is profitable and helps you understand your overall financial performance.
Balance Sheet
The Balance Sheet provides a snapshot of your Shopify business's financial position at a given point in time. It lists your assets, liabilities, and equity, helping you assess your business's financial stability and net worth.
Cash Flow Statement
The Cash Flow Statement tracks the movement of cash in and out of your Shopify business. It highlights how well you manage your cash, showing whether your business can cover its expenses, invest in growth, and maintain liquidity.
Industry Benchmarking
Industry benchmarking allows you to compare your financial performance against similar businesses in your sector. By analyzing key metrics like revenue, profit margins, and returns ratios, you can identify areas where your business excels or needs improvement. Link My Books incorporates benchmarking into its analytics suite, providing you with the insights needed to set realistic goals, optimize operations, and stay competitive.
Key financial metrics to know for Shopify sellers
Financial metrics can help you understand the current state of your business, as well as give you concrete, data-based guidelines to expand your Shopify operation.
Cost of Goods Sold (COGS)
Cost of Goods Sold (COGS) represents the direct costs associated with producing or purchasing the products you sell. Tracking COGS is crucial for understanding your profit margins and pricing strategies, as it directly impacts your business’s profitability.
Gross Margin
Gross Margin is the percentage of revenue that exceeds the Cost of Goods Sold (COGS). It measures how efficiently your Shopify business generates profit from sales after covering the costs of production and is essential for pricing, cost control, and profitability analysis.
Inventory Turnover
Inventory Turnover measures how often your inventory is sold and replaced over a specific period. A higher turnover rate indicates efficient inventory management, reducing the risk of excess stock and associated holding costs, while a lower rate may signal overstocking or sluggish sales.
Returns Ratio
The Returns Ratio measures the percentage of products returned by customers compared to the total number of products sold. This metric, integrated into Link My Books analytics, helps you understand the impact of returns on your profitability and allows for benchmarking against industry standards. Monitoring your Returns Ratio enables you to identify potential issues with product quality, customer satisfaction, or marketing strategies, ultimately helping to reduce return rates and improve overall business performance.
LTV - Lifetime Value of a Customer
The LifeTime Value (LTV) of a customer represents the total revenue a business can expect from a single customer over the duration of their relationship. Tracking LTV helps evaluate the long-term profitability of acquiring and retaining customers, guiding decisions on marketing and customer retention strategies.
CAC - Cost of Acquiring a Customer
The Cost of Acquiring a Customer (CAC) measures the total cost incurred to acquire a new customer, including marketing and sales expenses. By comparing CAC to LTV, you can determine the effectiveness of your customer acquisition strategy. Ideally, if your LTV is 2-3 times your CAC, it indicates that your acquisition efforts are cost-effective and scalable, allowing you to expand your customer base while maintaining profitability.
Shopify and VAT, GST, and Sales Taxes
Managing taxes as a Shopify seller can be complex, especially when operating in different countries with varying tax systems. In the anglophone world, these tax systems include sales tax in the USA, VAT in the UK, and GST in Australia and New Zealand. Understanding and managing these taxes is crucial to staying compliant and avoiding penalties.
Considerations for managing sales taxes
Managing sales taxes on Shopify involves understanding which taxes apply to your products and where your customers are located. It's important to stay updated on changing tax rates and regulations across different jurisdictions to ensure accurate tax collection and remittance.
Integration with tax software
Integrating Shopify with tax software can simplify the process of calculating, collecting, and filing sales taxes. This integration ensures that tax rates are applied correctly at checkout and that your tax filings are accurate and timely, reducing the risk of penalties.
Compliance with tax regulations
Staying compliant with tax regulations is critical for avoiding fines and legal issues. This includes correctly categorising products, understanding nexus laws, and filing taxes in every jurisdiction where you have sales tax obligations. Regular reviews and updates to your tax settings on Shopify help maintain compliance.
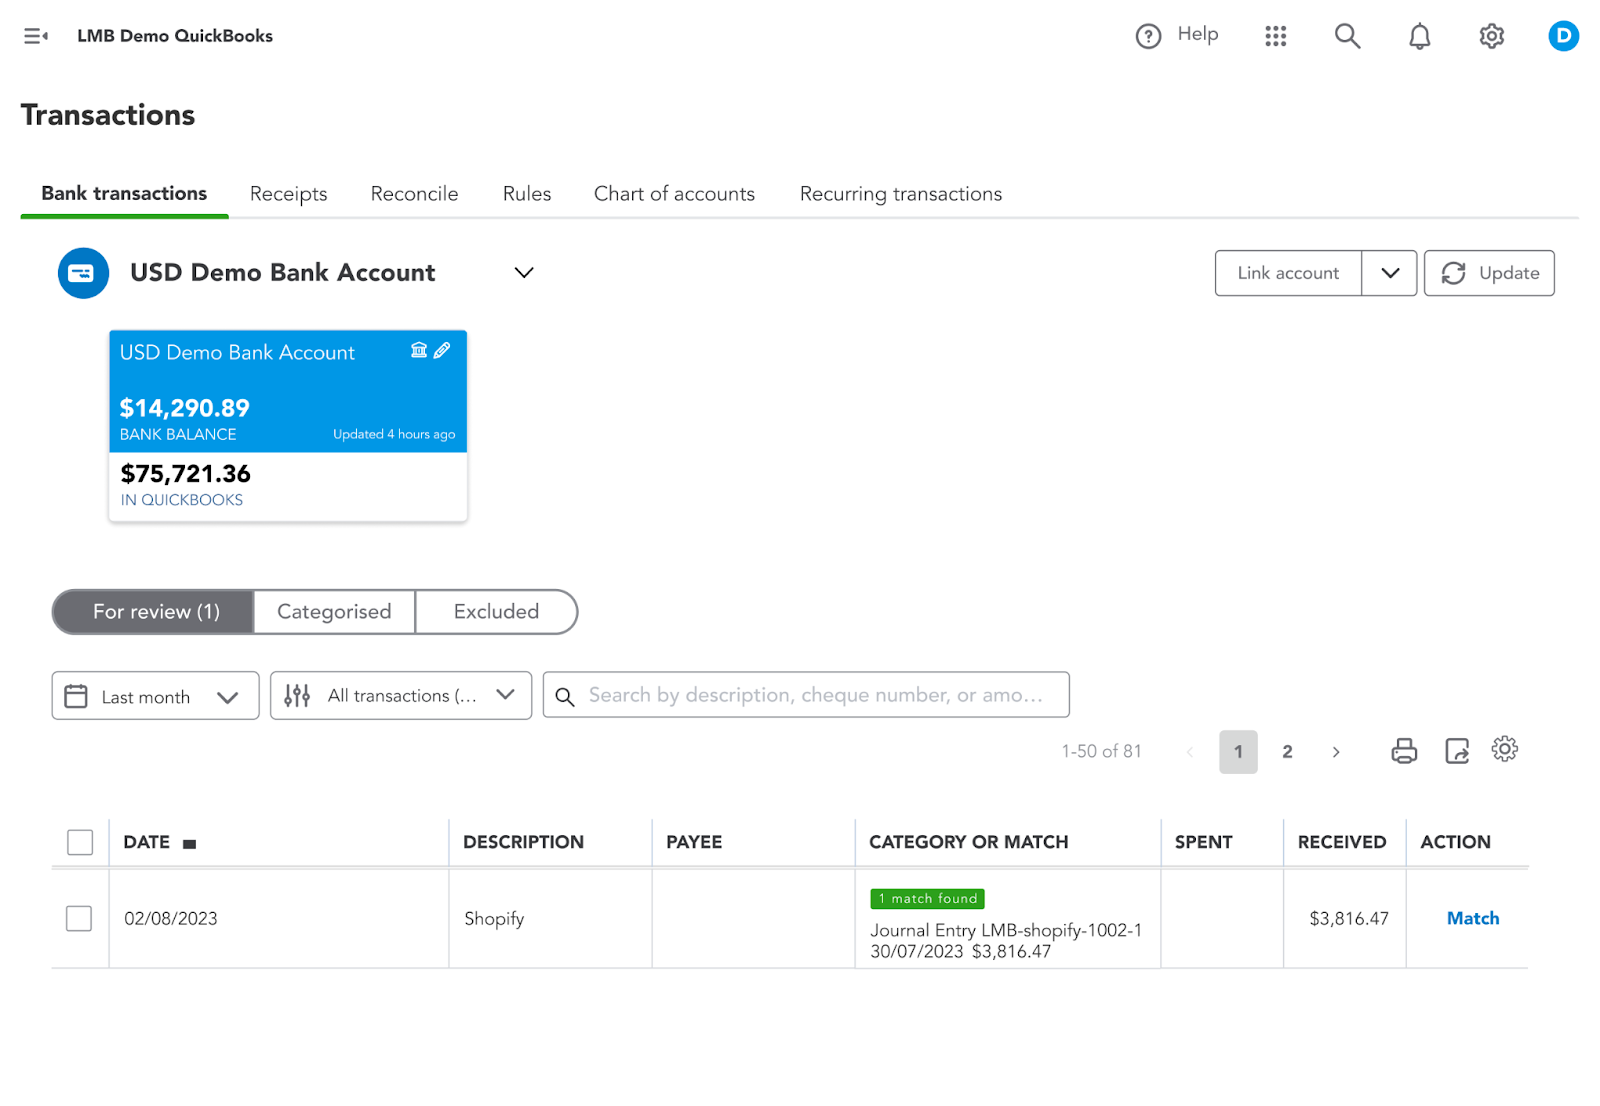
How to reconcile payments into the bank from Shopify & other payment gateways?
Reconciling payments into your bank from Shopify and other payment gateways involves matching the deposits recorded in your bank account with the sales and transactions recorded in Shopify and other payment platforms. Here’s how to do it:
- Gather financial records: Collect all records, including Shopify sales reports, payment gateway statements (such as PayPal or Stripe), and bank statements.
- Match transactions: Compare the deposits listed in your bank statement with the sales recorded in Shopify and payment gateway reports. Ensure that the amounts match, taking into account any fees deducted by the payment gateways.
- Account for fees and charges: Payment gateways often deduct fees before depositing funds into your bank account. Ensure that these fees are recorded separately in your accounting software and that the net deposit matches the bank statement.
- Check for discrepancies: If there are any discrepancies between the bank deposits and the recorded sales, investigate the reasons. Common issues include delayed payments, refunds, or chargebacks.
- Record adjustments: If necessary, make adjustments in your accounting software to reflect fees, refunds, or other transactions that affect the net deposit.
- Reconcile in accounting software: Once all transactions are matched and adjustments are made, mark the bank statement as reconciled in your accounting software. This confirms that your bank records match your sales records.
Using Spreadsheets for Your Shopify Business
Many Shopify businesses start by managing their finances using spreadsheets, which can be an effective solution in the early stages. Spreadsheets allow for basic tracking of income, expenses, and inventory, providing a simple and familiar tool for bookkeeping. However, as your business grows, the limitations of spreadsheets become apparent.
Spreadsheets can quickly become unmanageable with large volumes of data, leading to errors, inefficiencies, and difficulty in maintaining accurate records. Manual data entry increases the risk of mistakes, and the lack of automation means time-consuming updates and reconciliations. Additionally, spreadsheets lack the advanced features of accounting software, such as automated tax calculations, real-time financial insights, and integration with payment gateways and Shopify.
For a growing Shopify business, transitioning from spreadsheets to specialised accounting software like Link My Books is essential for maintaining accurate, efficient, and scalable financial management.
FAQ
How do I get the data I need from Shopify?
You can access the data you need from Shopify by using the built-in reporting tools, which allow you to generate various financial, sales, and tax reports. Additionally, you can export data in CSV format for further analysis or integration with accounting software.
What accounting system does Shopify use?
Shopify itself does not have a proprietary accounting system. However, it integrates seamlessly with various accounting software platforms like QuickBooks, Xero, and Link My Books, allowing you to manage your financial data efficiently.
Do you need a business account to be a Shopify seller?
While it’s not mandatory to have a business bank account to be a Shopify seller, it’s highly recommended. A business account helps separate personal and business finances, making bookkeeping, tax filing, and financial management much easier.
What does Reverse Charge mean?
The Reverse Charge is a tax mechanism where the buyer is responsible for reporting the VAT on a transaction, rather than the seller. This is commonly used in cross-border transactions within the EU to shift the tax reporting responsibility from the seller to the buyer.
How can I double check the tax rate Shopify is charging me?
You can double-check the tax rate Shopify is charging by reviewing the tax settings in your Shopify admin under "Settings" > "Taxes and duties." Ensure that the rates are correctly set for each region. You can also cross-reference with the official tax rates from relevant tax authorities.
How to calculate the COGS for Shopify Bookkeeping
To calculate the Cost of Goods Sold (COGS) for Shopify bookkeeping, sum up the direct costs associated with producing or purchasing the goods sold during a specific period. This includes the cost of raw materials, manufacturing, shipping, and any other direct expenses. Use the formula:
COGS = Opening Inventory + Purchases during the Period − Closing Inventory
How to reconcile payments into the bank from Shopify & other payment gateways?
Reconciling payments from Shopify and other payment gateways into your bank involves matching the amounts deposited into your bank account with the sales recorded on Shopify and the statements provided by payment gateways. Here's a step-by-step guide:
- Collect the necessary records: Gather your bank statements, Shopify sales reports, and payment gateway statements (such as PayPal, Stripe, or Square).
- Match deposits with sales: Compare the deposits listed in your bank account with the sales recorded in Shopify and other payment gateways. Ensure that the amounts match, considering any processing fees deducted by the payment gateways.
- Account for fees and adjustments: Payment gateways often deduct transaction fees before depositing funds. Record these fees in your accounting system and ensure that the net amount matches what was deposited in your bank.
- Reconcile differences: If there are discrepancies between your bank deposits and the amounts recorded in Shopify or payment gateways, investigate the cause. Common reasons include delayed payments, refunds, or chargebacks.
- Use accounting software: Automated accounting software, like Link My Books, can streamline this process by automatically importing and reconciling transactions, reducing the risk of errors and saving time.
- Finalise reconciliation: Once all transactions are matched and any discrepancies are resolved, mark the bank statement as reconciled in your accounting software to confirm that your records are accurate and up to date.
Make Shopify accounting fast, easy and accurate with Link My Books
Link My Books takes the complexity out of Shopify accounting by automating the most tedious and error-prone tasks. With seamless integrations and real-time insights, you can eliminate manual data entry, ensure accurate tax calculations, and keep your finances organised with ease.
By using Link My Books, you'll save time, reduce stress, and focus on growing your business—knowing that your accounting is handled efficiently and accurately.


.png)