


Managing Shopify sales tax reports manually is wasting your time and likely costing you money.
Shopify gives you plenty of raw tax data, but no single "perfect" report. If you’re trying to track sales tax by region, check tax compliance, or reconcile with Xero or QuickBooks, the manual process quickly becomes a mess:
- CSV downloads that don’t match your payouts
- Missing tax breakdowns across products and regions
- Hours wasted manually adjusting transactions
Worse, if you misreport sales tax, you risk penalties, audits, and overpaying.
The good news? You can automate all of this. In this guide, I’ll show you how to find and download Shopify sales tax data, and more importantly, how to automate the entire workflow with Link My Books, so your reports are always accurate and ready for your accountant.
Key Takeaways from this Post
Shopify’s sales tax reports require manual work, and the default reports aren’t accounting-friendly.
Without automation, most sellers waste time fixing CSV exports and risk tax filing errors.
Link My Books solves this by automatically syncing Shopify sales, tax, fees, and payouts with Xero or QuickBooks, ensuring accuracy and saving time.


What Most Shopify Sellers Get Wrong With Sales Tax Reports

If you’ve Googled "Shopify sales tax report," you’ve likely seen generic articles walking you through downloading the Sales Finance Summary or Tax Reports CSV.
That’s fine - but here’s what they don’t tell you:
Shopify’s native reports aren’t designed for proper accounting. They won’t match your bank deposits. They won’t separate taxes by region in a way that matches your VAT or sales tax obligations. And they won’t reconcile cleanly in Xero or QuickBooks.
Most sellers (and even some accountants) end up overpaying or underpaying tax because they rely on these incomplete reports.
Shopify itself isn’t a tax authority. You are still responsible for filing accurate tax returns and reconciling the correct amounts paid versus collected.
A Simpler Way
You can keep downloading reports and manually adjusting them…
Or, you can let Link My Books connect Shopify to Xero or QuickBooks, and automate it all:
- Auto-import sales, fees, refunds, and taxes
- Automatically map the correct tax rates
- Reconcile Shopify payouts to your bank feed in one click
If you want clean, audit-ready reports, this is the way.
How to Get Your Shopify Sales Tax Report - The Easy Way

Before we walk through the manual steps, here’s a reality check:
You don’t have to download and clean Shopify CSVs at all. If you’re using Link My Books, the entire process is automated:
✅ Your Shopify sales, refunds, fees, and taxes sync automatically to Xero or QuickBooks
✅ All tax rates are correctly mapped - whether it’s UK VAT, EU OSS, or US sales tax
✅ You get clean, audit-ready reports that match your Shopify payouts exactly
✅ Reconciliation becomes a one-click process - no more hours wasted matching reports to your bank feed
Here’s how it works:
1. Connect Shopify to Xero or QuickBooks via Link My Books
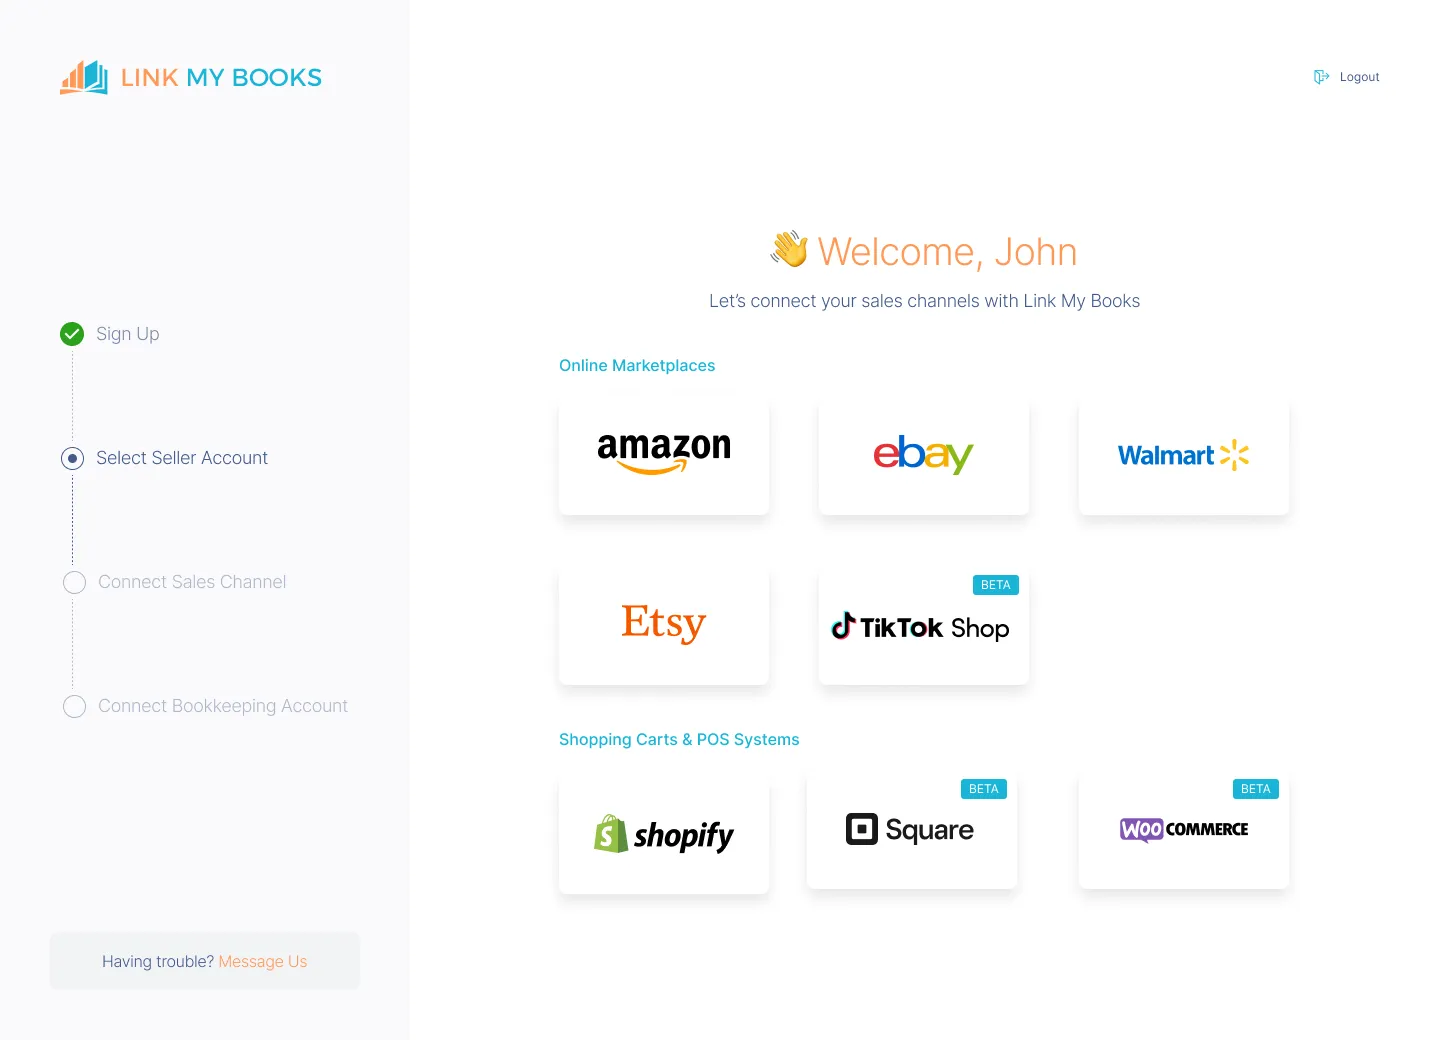
Once connected, Link My Books ensures seamless data flow between Shopify and your accounting platform.
You have a 14-day free trial for Link My Books that you can use to get a taste of how simple your accounting could be.
2. Use The Easy Guided Setup Wizard

You’ll be prompted to map each type of Shopify transaction, like sales revenue, discounts, fees, and taxes, to the right accounts in QuickBooks or Xero.
Link My Books simplifies this by suggesting default categories, but you can customize it to match your specific needs.
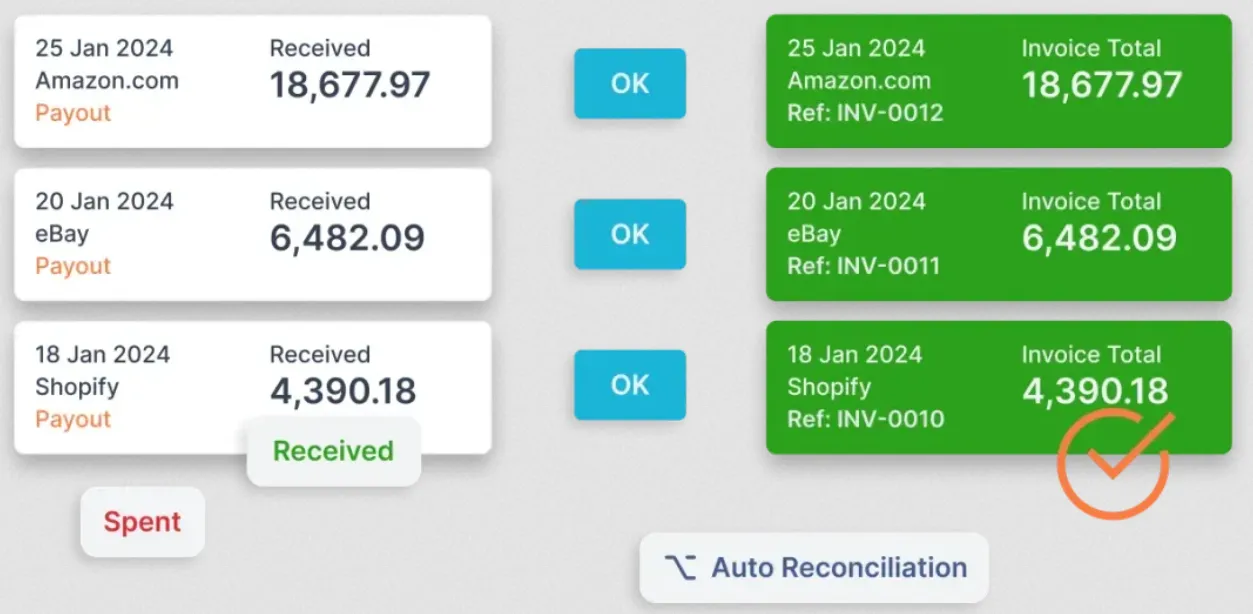
3. Generate a Clean Summary

Link My Books creates a detailed summary, breaking down each payout into sales, refunds, fees, and taxes. It applies the correct tax rates (UK VAT or US sales tax) to each transaction and allocates everything to the right accounts.
4. Reconcile Effortlessly

The entry posted to Xero or QuickBooks matches your Shopify payout exactly, making reconciliation a one-click process. No more spreadsheets or manual adjustments.

You can try Link My Books for free and simplify VAT compliance while spending more time running your business (not your books).
If you still want to do it the manual way, here is how:
How to Get Your Sales Tax Report from Shopify
- Go to your Shopify Admin, Navigate to Analytics → Reports
- Under Taxes, select the relevant report
- Select the date range (monthly, quarterly, yearly, or custom)
- Click Export → choose CSV
- Manually clean and map this data for your accounting software or tax filing
Important notes:
- Shopify does not provide a single export that perfectly matches your payouts and tax obligations, this is why so many sellers run into problems with manual reconciliation.
- Taxes collected on behalf of third-party processors (e.g. PayPal, Klarna) may not appear in your default report, another common pitfall.
- If you need detailed US state-by-state sales tax analysis (for economic nexus purposes), many sellers also export Orders → Export and use Pivot Tables to calculate taxable sales and transaction counts by state. Shopify’s built-in Taxes Finance Report does not provide this level of detail.
Step #1: Navigate to Shopify Admin → Analytics → Reports
- Log in to your Shopify Admin.
- In the left-hand menu, click Analytics → Reports.
- This opens the Reports dashboard, where you can access different report types.
Common issues:
- If you don’t see the full Reports section, your Shopify plan may not include advanced reporting. The Taxes Finance Report is available on Shopify Standard and above.
Step #2: Open the Taxes Finance Report
- Under the Reports menu, find the section labeled Taxes.
- Click on Taxes Finance Report.
This is your main tax report - it shows:
- Total tax collected per country/region
- Tax breakdown by order source
- Date of collection
Why this matters: This is the closest thing Shopify provides to a “sales tax report.” You’ll use this for tax filings, cross-checking VAT compliance, and reconciling tax totals in Xero or QuickBooks.
Step #3: Select the Date Range
- At the top of the report, select the Date Range dropdown.
- Choose from presets (Last 30 days, Last Quarter, Last Year) or set a Custom Range for your reporting period.
Tip: Always match your selected date range to your accounting/tax period (monthly, quarterly, annually).
Step #4: Export the Report to CSV
- Click Export → choose CSV for Excel, Numbers, or other spreadsheet programs.
- Shopify will generate a CSV file - this may take a minute depending on report size.
- Download and save the file.
Step #5: Clean and Map the Data
Here’s where the manual work begins:
- Open the CSV file in Excel or Google Sheets.
- You’ll need to manually map columns to match what your accountant or accounting software expects:
- Separate tax amounts by country/region
- Check if third-party payment processor taxes are included or missing
- Match totals to Shopify payouts (these rarely match perfectly with the default report)
Common pitfalls:
- Shopify reports taxes collected, but not necessarily taxes remitted (depending on marketplace facilitator laws in your region).
- If you use multiple sales channels or currencies, this step gets very complex very quickly.
Summary: Manual vs. Automated
Doing this manually means spending hours every quarter cleaning CSV files and hoping they match your actual payouts.
Or - you can automate the entire flow with Link My Books.
How Link My Books Makes Shopify Sales Tax Reports Simple & Fast
If you’re tired of spending hours downloading and fixing Shopify CSVs, there’s a better way.
Link My Books automates your entire Shopify bookkeeping and tax reporting process. Here’s what you can expect:
1. Automated Sales Reconciliation
With Link My Books, your Shopify sales data is automatically imported into QuickBooks or Xero, where each transaction is accurately categorized. This eliminates the need for manual entry and ensures your books are consistently up-to-date, making monthly reconciliations smooth and effortless.
2. Accurate Tax Calculations

Tax compliance is made easy with Link My Books, as it calculates sales tax for you based on real-time data from Shopify. Whether you’re managing Shopify VAT or regional sales tax, Link My Books ensures accuracy with each transaction, so you’ll never have to worry about misreporting or paying penalties.
3. Comprehensive Financial Reporting

Link My Books provides detailed, easy-to-read reports that show everything from profitability to tax liabilities. Built with Shopify sellers in mind, these reports help you see exactly how your business is performing, offering insights that are essential for planning and growth.
4. Cost of Goods Tracking

Stay on top of your profit margins by tracking your Cost of Goods Sold (COGS) directly through Link My Books. This feature helps you understand the true profitability of each sale and keeps your financial reporting accurate, giving you a clear view of both costs and revenue.
5. Benchmarking

Link My Books offers a unique benchmarking feature, allowing you to compare your store’s performance against anonymized data from similar businesses. This comparison gives you a real sense of how you’re doing in the market, helping you identify areas for improvement or growth opportunities.
What is a Shopify Sales Tax Report?
A Shopify sales tax report is a financial document that shows the total amount of taxes collected through your Shopify store, broken down by region and order source.
It typically includes:
- Total taxes collected by country/region
- Tax breakdowns by order source (Shopify Payments, PayPal, etc.)
- Collection dates and amounts
- Tax rates applied to transactions
These reports help merchants file accurate tax returns, stay compliant with tax authorities, and reconcile tax obligations with their accounting software.
⚠️ Keep in mind: Shopify’s native tax reports require manual processing and do not cover all data (e.g. third-party processor taxes). That’s why automated tools like Link My Books are essential.
Why Do You Need a Shopify Sales Tax Report?
It’s not just about filing taxes. Your Shopify sales tax report gives you key financial data that protects your margins, ensures compliance, and simplifies reconciliation - if you use it correctly.
Here’s why it matters:
Stay Tax Compliant and Avoid Penalties
Tax authorities expect accurate reporting by region and tax type.
Relying on Shopify tax documents alone can leave gaps:
- You may not see taxes collected by third-party processors (PayPal, Klarna, etc.)
- Refunds and discounts may not be applied correctly
- OSS (EU VAT) and UK VAT need careful mapping, a common source of overpayments
Reconcile Shopify Payouts Correctly
Your Shopify transaction report and Payouts don’t always match your bank feed. Fees, refunds, adjustments, and payment gateway charges can cause reconciliation headaches.
Understand Your True Profitability
Many sellers focus on gross sales, but your margins depend on accurate tax and fee reporting.
By using the best Shopify accounting software stack - Shopify + Xero or QuickBooks + Link My Books - you can:
- Track taxes collected and owed
- Monitor true net profit after taxes and fees
- Make better pricing and product decisions
Without accurate sales tax data, you can’t run a truly profitable Shopify business - or scale confidently.
Essential Shopify Sales Tax Report Data for Accurate Bookkeeping
If you want clean, accurate books, it’s not enough to download a single Shopify tax document.
You need to track key figures across multiple reports, and Shopify makes this tricky.
Here’s what matters most for tax filing and reconciliation:
Important:
- Shopify tax documents (like the Taxes Finance Report) do not give you a full, accountant-ready picture on their own.
- You also need payout reconciliation and clean mapping of taxes vs. collected/paid amounts, which is why so many sellers now automate this with Link My Books.
How to Read Shopify Sales Tax Report Statements
Your Taxes Finance Report and Sales Finance Report show tax collected, but you’ll still need to check:
- Which taxes were collected by Shopify vs. third-party processors (PayPal, Klarna, etc.)
- Which taxes you are responsible to file
- Refunds and adjustments - these impact the tax you owe
For yearly and daily reports:
- Use custom date ranges to create a yearly tax report.
- Use daily reports if you want to match individual payouts to bank deposits (Link My Books automates this).
If you rely only on Shopify tax documents, you risk missing critical details that could lead to tax errors.
Report Types and Uses
FAQ on Shopify Sales Tax Report

How do I get my tax information from Shopify?
You can access tax information through Analytics → Reports → Taxes Finance Report in your Shopify Admin. This report shows taxes collected by country and order source.
⚠️ Keep in mind: Shopify tax documents do not provide a complete picture for proper accounting; you’ll also need to reconcile payouts and fees.
How to get 1099 from Shopify seller account?
Shopify itself does not issue 1099 forms, but third-party payment processors like PayPal or Shopify Payments may.
If you use Shopify Payments, log in to the Payments section to download your 1099-K, if applicable.
How do I get my 1095 from Shopify?
Shopify does not provide a 1095 form, this is a healthcare-related document not connected to Shopify sales tax reporting. If you are seeing this referenced, it likely does not apply to your Shopify business.
How do I get tax documents from Shopify?
You can generate Shopify tax documents by exporting:
- Taxes Finance Report (via Reports → Taxes)
- Sales Finance Report for full revenue breakdown
- Shopify transaction report (via order exports if you need line-item detail per transaction)
For accurate filing and reconciliation, many sellers use Link My Books to automate tax mapping and reporting.
How do you avoid double-paying sales tax on Shopify?
To avoid double paying:
- Check which taxes Shopify collects and remits (Marketplace Facilitator rules vary by region)
- Reconcile refunds and discounts correctly
- Separate Shopify-collected taxes from taxes you need to remit manually
Best practice: Automate this with Link My Books, it maps taxes correctly so you don’t overpay.
Does Shopify report sales to states?
In the US, Shopify itself does not report sales to states unless required by specific Marketplace Facilitator laws, which vary by state and payment processor.
- If you use Shopify Payments, Shopify may handle tax collection and remittance for certain states.
- You are still responsible for accurate reporting on all other channels and payment methods.
How often should I export tax reports?
For manual workflows:
- Monthly for bookkeeping
- Quarterly for VAT returns
- Annually for year-end tax filing
What is the difference between the Sales Finance Report and the Taxes Finance Report?
- Sales Finance Report: Shows gross sales, discounts, and refunds for revenue tracking.
- Taxes Finance Report: Shows taxes collected by country/region for tax filing.
Do I still need my accountant if I use Link My Books?
Yes, your accountant ensures you stay compliant and files returns correctly.
But Link My Books removes the manual work of preparing accurate data, so your accountant can focus on higher-value advice (not cleaning CSV files).
Simplify Your Reports with Link My Books
If you want to stop wasting time on manual downloads and mismatched tax documents, Link My Books is your best next step.
✅ Syncs all your Shopify sales, refunds, fees, and taxes with Xero or QuickBooks
✅ Automatically applies correct VAT, OSS, and US sales tax rates — so you stay compliant
✅ Reconciles Shopify payouts with your bank feed in one click
✅ Saves you hours every month and protects your profit margins
If you’re serious about running a profitable Shopify business, this is the simplest way to get there.
👉 Start your free trial of Link My Books today, and discover why it’s trusted by thousands of sellers.


.png)